-本日のアジェンダ-
1限目
学科 HTML基礎⑤
タグの復習
2限目
学科 HTML基礎⑤
flexboxについて
3限目
学科 HTML基礎⑤
floatについて
4限目
学科 HTML基礎⑤
リンクについて
5限目
学科 HTML基礎⑤
まとめ
本日のテーマ
横並びメニューを作りましょう
検証ツール
GoogleChromeのデベロッパーツール(要素の検証機能)は、CSSのデザインの検証やコードのチェックに便利です!
リンクの文字色
リンクの状態別に文字色を指定することができます。
a {
    color: black;
    text-decoration: none;
}
a:hover {
    color: red;
}flexboxで横並び
親要素の中に子要素を入れる。
親要素にdisplay: flex;だけ
▼html

<div class="container">
  <div class="item">ITEM1</div>
  <div class="item">ITEM2</div>
  <div class="item">ITEM3</div>
  <div class="item">ITEM4</div>
</div>
<div>ここからは違う要素</div>
▼css
.container {
display: flex;
}
.item {
background: red;
margin: 10px;
padding: 10px;
}floatで横並び
flexboxと同様、親要素の中に子要素を入れる。
次の要素が回り込まない為、float解除を行う
親要素にoverflow: hidden;
子要素にfloat: left;
▼css

.container {
    overflow: hidden;
}
.item {
    background: red;
    margin: 10px;
    padding: 10px;
    float: left;
}
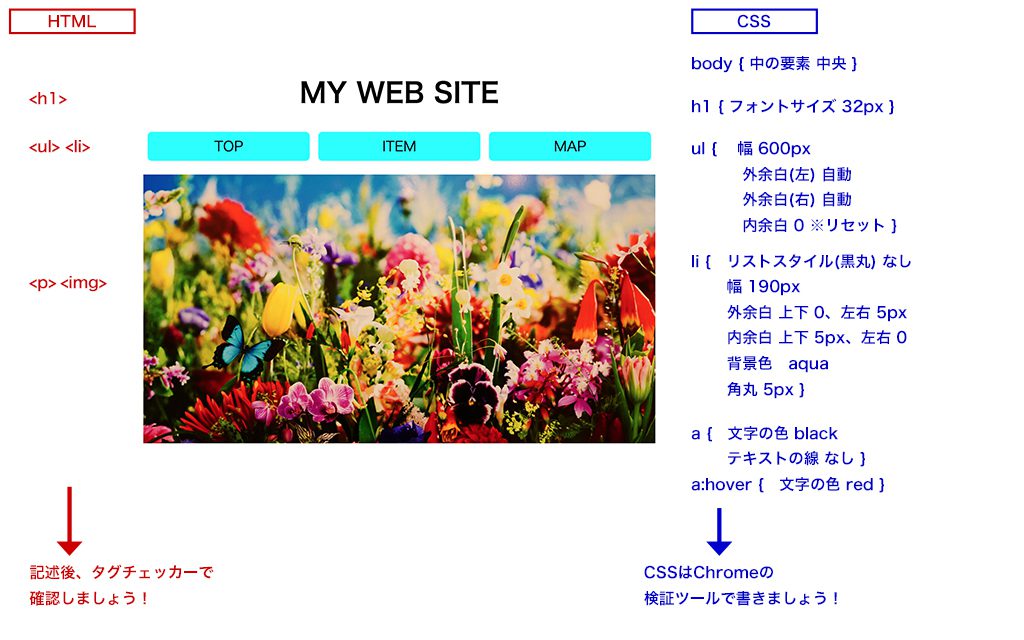
横並びのメニューを作りましょう

HTMLの記述ヒント
<h1>には「MY WEB SITE」
<ul>には<li>が3つ。左から「TOP」「ITEM」「MAP」リンク先はそれぞれ「index.html」「item.html」「map.html」
<p>には<img>、画像のソースは絶対パスで好きな画像。altは必須。画像の幅を600としてください。
▼HTMLの答え

<h1>MY WEB SITE</h1>
<ul>
  <li><a href="index.html">TOP</a></li>
  <li><a href="item.html">ITEM</a></li>
  <li><a href="map.html">MAP</a></li>
</ul>
<p><img src="https://cafict.com/wp-content/uploads/blog20180821_0.jpg" alt="" width="600"></p>
CSSの記述のヒント
body {
中の要素:中央
}
h1 {
フォントサイズ:32px
}
ul {
幅:600px
外余白(左):自動
外余白(右):自動
内余白:0 ※リセット
}
li {
リストスタイル(黒丸):なし
幅:190px
外余白:上下 0、左右 5px
内余白:上下 5px、左右 0
背景色:aqua
角丸:5px
}
a {
文字の色:black
テキストの線:なし
}
a:hover {
文字の色:red
}
▼CSSの答え
body {
text-align: center;
}
h1 {
font-size: 32px;
}
ul {
width: 600px;
margin-left: auto;
margin-right: auto;
padding: 0; /*リセット*/
}
li {
list-style: none;
width: 190px;
margin: 0 5px;
padding: 5px 0;
background-color: aqua;
border-radius: 5px;
}
a {
color: black;
text-decoration: none;
}
a:hover {
color: red;
}